
Evaluate different wearable application development boards and prototype boards
“The open-source Arduino concept has proven to be a huge success among hobbyists and makers. The concept has also been embraced by professional designers for early development and prototyping, and more recently for full design. With the advent of applications such as wearables and health monitoring, both types of users require higher performance and more functionality in smaller and smaller board form factors.
“
The open-source Arduino concept has proven to be a huge success among hobbyists and makers. The concept has also been embraced by professional designers for early development and prototyping, and more recently for full design. With the advent of applications such as wearables and health monitoring, both types of users require higher performance and more functionality in smaller and smaller board form factors.
This article briefly discusses how Arduino boards can be used to meet the high-performance and functional needs of makers and professionals in low-power, space-constrained applications. It then introduces and shows how to start a project with the newest member of the Arduino family, the Seeeduino XIAO from Seeed Technology Co.
How to Use Arduino for Wearable Design Needs
Many hobbyists and designers are interested in developing products with small physical dimensions for deployment in space-constrained environments, including wearable devices. These are usually intelligent Electronic systems, often based on a combination of microcontrollers and detection and Display devices. Sometimes these products are used as high-tech accessories. In some cases, it can be placed against and/or worn on the surface of the skin and can be used to detect, analyze and transmit body data such as body temperature, heart rate and pulse oxygenation, as well as environmental data. Other times, instant biofeedback is provided to the wearer.
For this type of design, many hobbyists and makers use the Arduino microcomputer development board. As a result, more and more professional engineers are also using these development boards as evaluation and prototyping platforms to speed up and reduce the cost of evaluating ICs, sensors and peripherals.
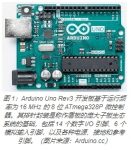
Such users typically start with the A000073 Arduino Uno Rev3, which has been billed as a “must-have starter board” (Figure 1). The board is based on the ATMEGA328P-AUR microcontroller from Atmel (now Microchip Technology). The 5 V processor provides 14 digital input/output (I/O), 6 of which provide pulse width modulation (PWM) capability, and 6 analog input pins that can also be used as digital I/O if necessary O. In addition, two external interrupts are supported on digital I/O pins 2 and 3, as well as one each for the UART, SPI, and I2C interfaces.
The board has the limitations of an 8-bit data path and a 16 MHz clock, plus the Arduino Uno only offers 32 KB of Flash program memory and 2 KB of SRAM; otherwise, it measures 68.6 x 53.4 mm (36.63 cm2), This is too big for many applications.
One way to reduce the physical size of this microprocessor development board is to migrate to the ABX00028 Arduino Nano Every, which is based on Atmel’s ATMEGA4809-MUR microcontroller (Figure 2). 50% more program memory (48 KB) than Arduino Uno, and 3 times the SRAM capacity (6 KB) of Arduino Uno. Like the Arduino Uno, the Arduino Nano Every is based on a 5 V processor that provides 14 digital I/O and 6 analog input pins that can also be used as digital I/O if necessary. Also, like the Uno, the Nano Every offers one each of UART, SPI, and I2C interfaces. However, unlike the Uno which only supports two external interrupts, all digital pins of the Nano Every can be used as external interrupts.

Although the Arduino Nano Every still has the 8-bit data bus limit, it has a faster clock (20 MHz) and more storage space (48 KB flash and 6 KB SRAM). Even more important for size-constrained projects, the Arduino Nano Every is only 45 x 18 mm (8.1 cm2).
Another popular option is the DEV-13736 Teensy 3.2 from SparkFun Electronics, which can be programmed using Arduino’s integrated development environment (IDE) (Figure 3). On the I/O front, this 3.3 V board has been greatly enhanced with 34 digital pins, 12 of which support PWM, and 21 high-resolution analog inputs.
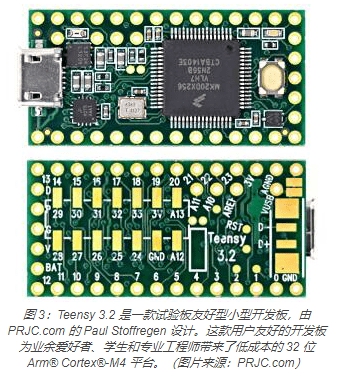
The Teensy 3.2 features NXP’s MK20DX256VMC7R Kinetis K20 microcontroller. The K20 features a 32-bit Arm Cortex-M4 processor core running at 72 MHz with 256 KB of Flash and 64 KB of SRAM. Of particular interest for size-constrained projects, the Teensy 3.2 measures 35 x 18 mm (6.3 cm2), about three-quarters the size of the Arduino Nano Every.
Introduction to Seeeduino XIAO
Although the Teensy 3.2 is only 6.3 cm2, this is still too large for many applications. For those looking for a smaller, more powerful platform, the solution lies in the vast Arduino ecosystem. A relatively new option is Seeed Technology’s Seeeduino XIAO (Figure 4), which measures just 23.5 x 17.5 mm (4.11 cm2), the size of a standard postage stamp. The designers of Seeeduino XIAO also focused on ultra-low cost.
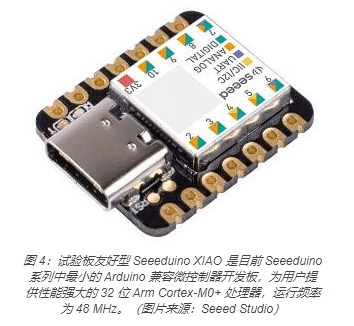
XIAO uses the ATSAMD21G18A-MUT SAMD21G18 microcontroller from Atmel. The microcontroller features a 32-bit Arm Cortex-M0+ processor core running at 48 MHz and is backed by 256 KB of Flash and 64 KB of SRAM.
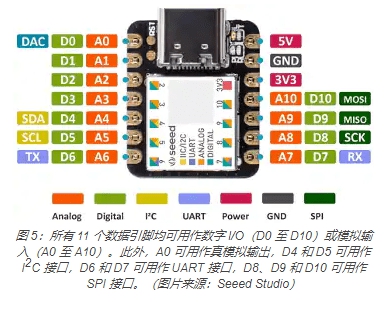
Although XIAO provides only 11 data pins, each pin can be used as digital I/O or analog input (Figure 5). Ten of the pins support PWM and one is equipped with a digital-to-analog converter (DAC), providing true analog output capability. In addition, XIAO also supports one each of UART, SPI and I2C interfaces.
Deploy and use Seeeduino XIAO
In general, using the Seeeduino XIAO is as easy as using any other Arduino or Arduino-compatible development board, but there are a few tips and tricks worth noting.
Making sure you’re using the latest version of the Arduino IDE is a good place to start. Next, visit the Seeeduino XIAO Wiki for instructions on how to enhance the Arduino IDE with the appropriate board manager.
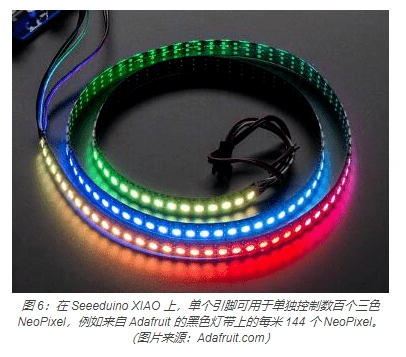
Many Seeeduino XIAO projects (wearable and others) will involve the use of WS2818-based tri-color NeoPixels (from Adafruit), such as the 2970 strip with 144 NeoPixels per meter (Figure 6).
A potential problem is that while traditional Arduino boards can continue to use older versions of the Adafruit NeoPixel library, the Seeeduino XIAO requires the latest and greatest version.
If an older version of the NeoPixel library is installed, strange and confusing error messages may follow. The workaround is to remove all older versions of the library from the system and install the latest and greatest version following the instructions on the Adafruit NeoPixel Überguide.
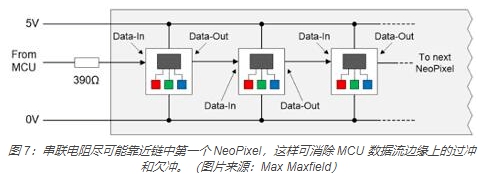
A potential concern is that the NeoPixel is sensitive to overshoot and undershoot on its data pins. The problem is that the fast edge rate of change of signals from modern microcontrollers can cause such characteristics. The solution is to place a resistor in series as close as possible to the first element in the NeoPixel chain (Figure 7). A 5% tolerance, 1/4 W, 390 Ω resistor like Stackpole Electronics Inc.’s CF14JT390R carbon film resistor is a suitable choice.
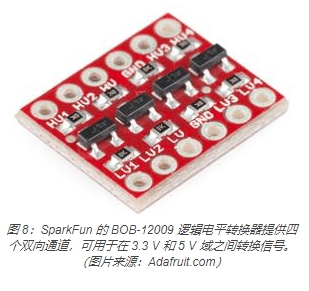
Another NeoPixel related issue is that the Seeeduino XIAO’s 3.3 V digital output may not be enough to drive the NeoPixel’s 5 V data input. One solution is to use the BOB-12009 logic level converter breakout board from SparkFun (Figure 8).
NeoPixel applications only require a one-way channel. The problem with the BOB-12009 is that it offers four bidirectional channels, a relatively large solution for space-constrained projects and a relatively expensive solution for cost-sensitive projects. A simple alternative is to use a Comchip Technology 1N4001 diode (Figure 9).
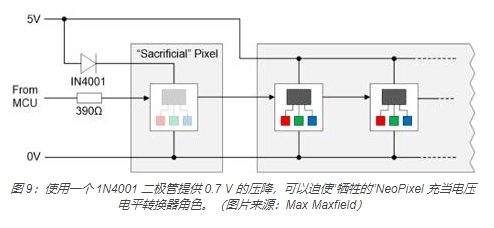
NeoPixel treats logic 1 as a voltage higher than 0.7 * VCC. In this example, NeoPixel treats logic 1 as 0.7 * 5 = 3.5 V.
The “sacrificial” Pixel is powered through an IN4001 diode with a 0.7 V forward drop, resulting in a supply voltage with VCC of 5 – 0.7 = 4.3 V, which means it treats a logic 1 as 0.7 * 4.3 = 3.01V. This, in turn, means that the Seeeduino XIAO’s 3.3 V signal is sufficient to drive the sacrificed pixels. At the same time, the 4.3 V output of the sacrificial pixel is sufficient to drive the data input of the next NeoPixel in the chain.
Summarize
Early Arduino development boards, such as the 8-bit, 16 MHz Arduino Uno, were physically large and limited in capacity and performance. Today, the Arduino ecosystem includes a wide variety of development boards, covering all shapes, sizes, and functions.
For size-constrained projects such as wearables, the Seeeduino XIAO offers a 32-bit Arm-Cortex-M0+ processor core running at 48 MHz with 256 KB of Flash and 64 KB of SRAM. All on a small breadboard-friendly platform measuring just 4.11 cm2, while also having extensive ecosystem support.
The Links: NL6448BC20-08E FS200R12PT4


