
“CMOS discharge has certain benefits, but everyone is not very familiar with coms discharge. In order to improve everyone’s understanding of cmos discharge, this article will introduce three methods of desktop cmos discharge.
“
CMOS discharge has certain benefits, but everyone is not very familiar with coms discharge. In order to improve everyone’s understanding of cmos discharge, this article will introduce three methods of desktop cmos discharge.
Introduction
Most users use CMOS discharge to reset BIOS settings. CMOS is actually the memory that stores the settings of the motherboard. Most of the existing motherboards are designed with CMOS discharge jumpers to facilitate users to perform discharge operations. However, there is more than one method of CMOS discharge. Read below to learn about three methods of desktop CMOS discharge.

CMOS originally means complementary metal oxide semiconductor memory, which is a large-scale raw material used in the manufacture of integrated circuit chips. It is a readable and writable RAM chip on the mainboard of a microcomputer. Personnel’s setting of certain parameters. The CMOS RAM chip is powered by the system through a backup battery, so the CMOS information will not be lost whether it is in a shutdown state or when the system is powered off.
Since the CMOSRAM chip itself is just a piece of memory, it only has the function of saving data, so the setting of various parameters in the CMOS must go through a special program. The early CMOS setup programs resided on floppy disks (such as IBM’s PC/AT models), which were very inconvenient to use. Now most manufacturers put the CMOS setup program in the BIOS chip, and you can enter the CMOS setup program by pressing a specific key when starting up, and it is very convenient to set the system, so this CMOS setup is usually called BIOS setup.
And sometimes you want to restore the motherboard settings to the factory settings or the computer power-on password is forgotten, you can discharge the CMOS, clear the memory and restore to the factory settings to solve the problem of forgetting the password.
Method 1: Use CMOS discharge jumpers
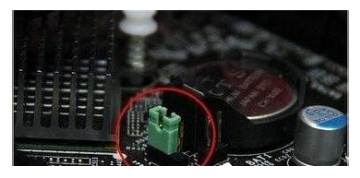
The CMOS discharge jumper is generally three-pin, located near the motherboard CMOS battery socket, and has battery discharge instructions. In the default state of the motherboard, the jumper cap will be connected to the pins marked “1” and “2”, which can be known as “Normal” from the discharge instructions, that is, the normal use state.
To use this jumper to discharge, first use tweezers or other tools to pull the jumper caps off the “1” and “2” pins, then slip them over the pins marked “2” and “3” Connected, it can be known from the discharge description that the state is “Clear CMOS”, that is, clear CMOS. After a short contact, various manual settings in the BIOS can be cleared and the motherboard can be restored to the factory default settings.
After removing the jumper cap, insert pins 2 and 3 and wait for a while, then remove the jumper cap and reinsert pins 1 and 2
After discharging the CMOS, the jumper cap needs to be removed from the “2” and “3” pins, and then restored to the original “1” and “2” pins.Note that if the jumper cap is not restored to the Normal state, the computer cannot be started and an alarm will sound.
Method 2: Remove the CMOS battery
I believe that many users have encountered the following situation: to discharge the CMOS, but cannot find the CMOS discharge jumper on the motherboard (such as ASUS motherboard), what should I do? At this time, the CMOS power supply battery can be used to achieve the purpose of discharge. Because the power supply of the BIOS is supplied by the CMOS battery, the power supply of the BIOS can be cut off by removing the battery, and the parameters set by itself in the BIOS will be cleared.
Find the CMOS battery socket on the motherboard, and then press the clip on the socket to hold the power supply battery to one side. At this time, the CMOS battery will automatically pop up. Take out the battery carefully.
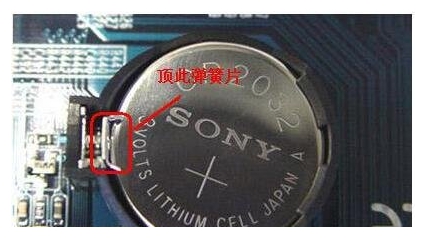
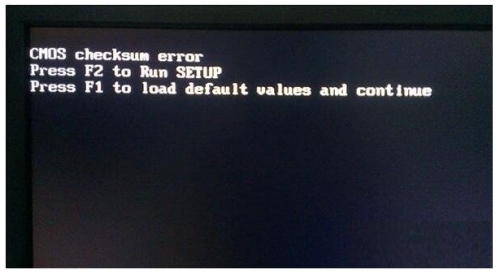
Then turn on the power of the host and start the computer, the screen will prompt that the data in the BIOS has been cleared, and you need to enter the BIOS to reset. In this way, it can be proved that the CMOS has been successfully discharged.
Method 3: Short-circuit the positive and negative poles of the battery socket
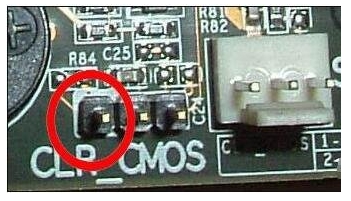
Although the method of removing the power supply battery to discharge the CMOS has a certain success rate, it is not a panacea. For some motherboards, even if the power supply battery is removed for a long time, the purpose of CMOS discharge cannot be achieved. In this case, you need to use the method of short-circuiting the positive and negative poles of the battery socket to discharge the CMOS. Of course, on motherboards with CMOS discharge jumpers, if you feel that the CMOS discharge operation is too troublesome, you can also use this method.
The CMOS battery socket is divided into positive and negative poles, and short-circuiting them can achieve the purpose of discharging. First take out the CMOS power supply battery on the motherboard, and then use conductive items (screwdrivers, tweezers and other conductive items), short-circuit the positive and negative electrodes on the battery socket to cause a short circuit (as shown in the figure below), so as to achieve CMOS purpose of discharge.
The above is about the three methods of desktop CMOS discharge. Through CMOS discharge, you can not only reset the BIOS settings, but also clear the original power-on password.
The Links: G190EG02-V0 CM1000HA-24E


